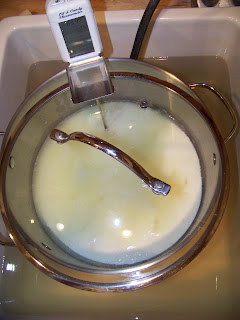
I thought I would take you through the process of how we made our goats milk cheddar. This is the original recipe from the Ricki Carroll book Home Cheese Making. As I discussed in yesterday's post, Contemplating Flavor for our Goats Milk Cheddar, we are saving Esther's milk and when we get 2 gallons we're going to try another batch this time using lipase to enhance the flavor.
This is our make-shift cheese mold that Zach whipped together with some PVC pipe, scrap wood and some long bolts.
He's promised to write a blog with more details as to how he put it together.
The PVC isn't a traditional cheese wheel size, but it worked so far. We also had to use unconventional methods for adding weight to the press. 50 pounds got interesting, but I'll get to that later.
We began by measuring out two gallons of goats milk.
I diluted the rennet in water.
We heated the milk to 85 degrees in a sink full of hot water. We found that using two thermometers helped regulate this process easily. We kept one thermometer in the water bath, and another in the milk. We would adjust the temperature of the water by adding hot water, and removing the cooled water with a measuring cup. If we kept the water around 104 degrees, the cheese stayed near 85 degrees. Heat must have been lost through the transfer through the pot, and by evaporating in the air. I also had the window open and it was a cool breezy night. I made notes as we went to help for next time.
When the milk was at 85 degrees we added the starter and let it set for 30 minutes.
Then we added the calcium chloride, which isn't in the recipe, but goats milk has a fine delicate curd and the calcium chloride helps to strengthen the curd. We figured, since we were beginners we needed all the strength we could get, ha!
Then, in goes the rennet. We stirred it with an "up and down motion" as described in the book. This was the fun part because this is where the curds start to separate and you really feel like you're making cheese!!! We kept it at 85 for one hour. Which sounds like a chore, but it went by fast. I sat by the sink baby sitting the thermometers, adding hot water, taking water out and reading some of the introduction sections in the Cheese Making book.
Then it was time to cut the curds. This was a little difficult. I think maybe less calcium chloride next time. The book said 1/2 inch, but our cubes were nowhere near perfect. But we did the best and hoped it would be ok.
Then we slowly heated the curds to 95 degrees and kept it at this temp for 45 minutes. The book instructs to raise the temp "no higher than 2 degrees every 5 minutes" we got it pretty close.
We strained the whey, salted the curds, wrapped them in cheesecloth and placed them in the PVC pipe.
The first weight increment is 20 pounds, then 30 then 50 pounds. The big question was what would we use for weights? We decided that strategically balanced dumbbells in a 4 gallon pot of water worked fine. Although, no one was allowed near the counter until the cheese had pressed overnight, for fear of toppling over the whole menagerie. I forgot to take a photo of the "tower" I'll try to remember next time we make cheese.
After the cheddar sat in the press overnight, I took it out and salted the outside. It sat for another day and was salted again. Now it's in our mini fridge at 52 degrees to age for at least 3 months. I'll be sure to let you know how it went. Cheese making isn't one of those things where you experience instant satisfaction, but we're hoping that it will be worth the wait!
Two years ago our friends Nate and Stacey shared a guest blog with us about how they made a delicious cow's milk Cobblestone Cheddar, check it out by clicking here! Nate and Stacey's Cobblestone Cheddar


No comments:
Post a Comment