Monday, January 31, 2011

Projects, Finished Yarn

A few days ago I posted some pictures of some colored yarn I had been working on. Here's the finished product plied and ready to use. It's a rough yarn, but I think it has lots of character.

The other skein is just our natural wool spun as is. I think I might dye it in it's yarn stage.
I need more spools for my spinning wheel. (Or maybe I just need to be more disciplined and finish one project before I start another ~Ha!) All my spools were full of yarn that needed to be plied, so I had to re-arrange things. But it was good because it gave me an excuse to use my Kniddy Noddy and...
My antique skiener (or skein winder).
This thing is awesome!! I can even ply right from the skiener which saves me from having to re-wind the spool. So cool and makes for fast work.
66 yards, 4 oz. Yay! Now to knit something, hmmm.

Reminder: Today is the last day to vote for this month's Name That Chicken Contest. I will be announcing the winner tomorrow!

Friday, January 28, 2011

Fiery Friday - Making a Center Punch

Welcome back!

I've probably already mentioned this a half a dozen times, but one of the things I love about being a blacksmith is being able to make my own tools. Instead of running up to the local hardware store and buying a cheap screwdriver that the tip will break off within a few months of use, I can just grab some spring steel and forge my own. A few months ago, I decided to change the rear brakes on my car, but for the life of me could not find the special lug key to get that special lug nut off. I called around and nobody had one in stock except for the dealership that was over a half hour away and they wanted $40 for it. Since all I needed was a large glorified torx bit (that's the star shaped one), I decided to make my own. I forged a 1/2" square bar to make it round. Now that it was about the right size and with it at a yellow heat (2200+ degrees), I pounded the end of it into the troublesome lug nut. Basically I just used the lug nut as a die to make impression that I needed. Once the star shaped tipped bar cooled I was able to latch a large pipe wrench onto the bar and crack the lug loose. Crisis diverted...

Today I'm going to show you how I make a center punch for marking steel. Mostly I use mine to mark where I want a hole drilled, but also sometimes to mark a measurement that I need to see after a piece of steel is red hot and any soapstone or silver pencil markings would have been burned off.

First I start with a piece of coil spring that I had lying around my garage. Most "spring" material is 1070 (with .7 % carbon) . It's the carbon that makes it stronger and that's what we need in a tool that will be pounded into other pieces of steel. I really don't know exactly what this is, but I have experimented with it and know from a few tests how it will react to my heat treating methods. We'll get into that later. I've already cut off a piece and straitened it hot.


Since this steel is "stronger" than the mild steel (low carbon) it will be more difficult to forge. What would normally take me one heat to forge in mild steel might take me two to forge with this spring steel.


Once it's good and hot, I start forging about 6" of the end of the spring into a square shape. I could simply leave this round, but I want to add a simple twist to the handle and twisting a piece of round stock, yep you guessed it, it pretty much stays round. So there is no real functional aspect to this twisted handle except perhaps to give a good grip for holding it.


Here is the once round spring forged square and ready for the twist.


After another good heat, I clamp it into my vice and twist about 5" of it. There is no need to take exact measurements here, I'm just going with whatever looks good. 


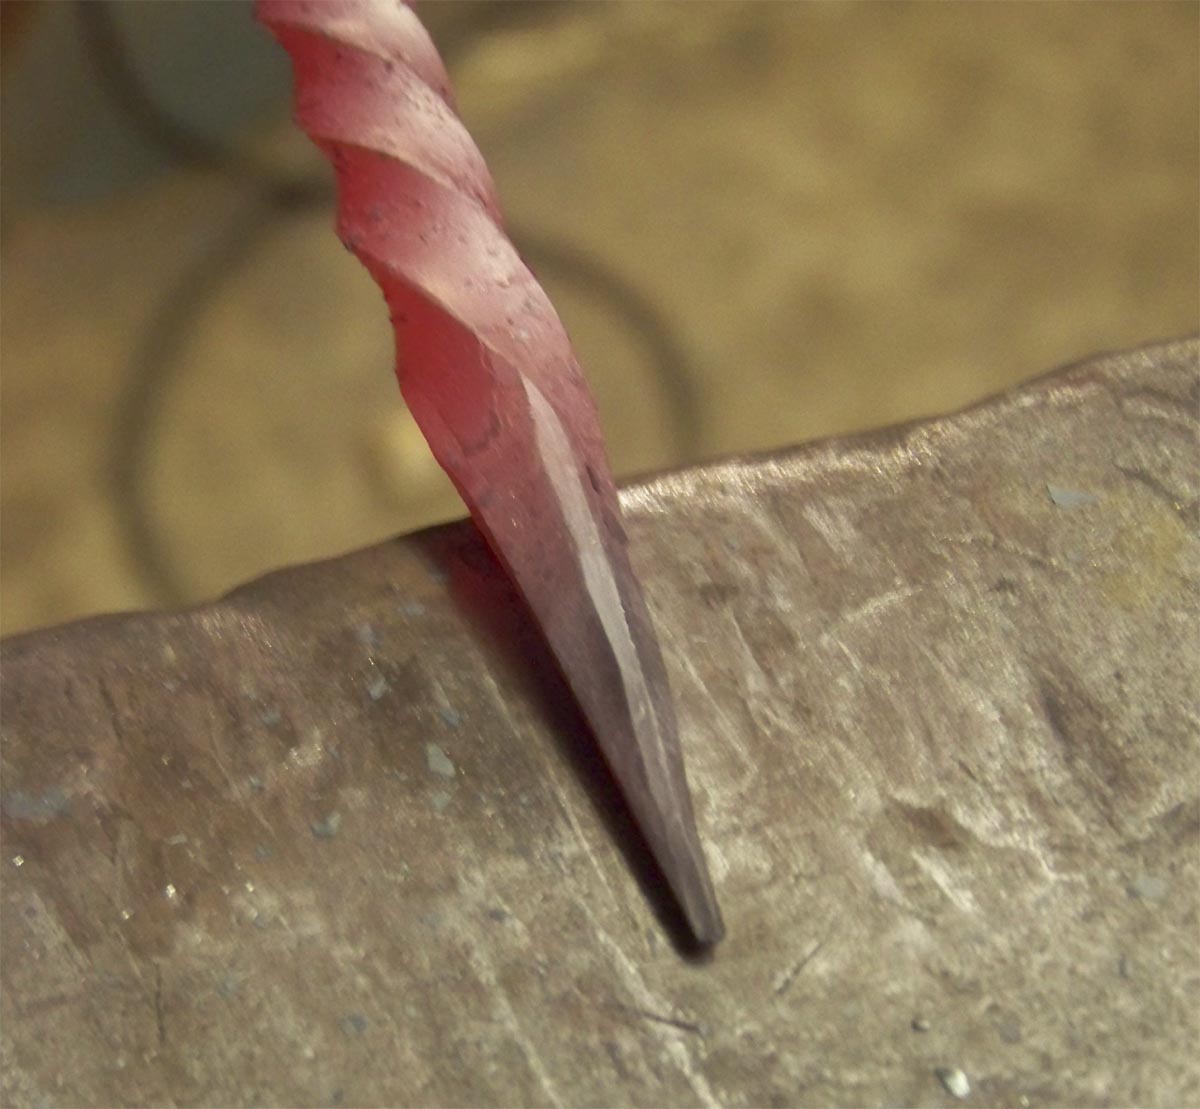
Once I have the twist the way that I want it, then I taper the tip to a point to form the business end of the center punch.


Here I  knocked the corners off the taper to start forming it round again. When forging tapers, it is always easier to forge them square first and then once you get the angle and size where you want it, forge it round again. (if you want it round)


Besides needing a bit of straightening, it is now fairly round.


To straighten everything up without damaging any of the details I get it hot again and use a wooden mallet and a piece of 2x4.


After it has had a chance to cool slowly I clamp it in my vice and cut it off just before the twist ends. Like I said earlier, I'm not measuring anything, I'm just making it look "right".


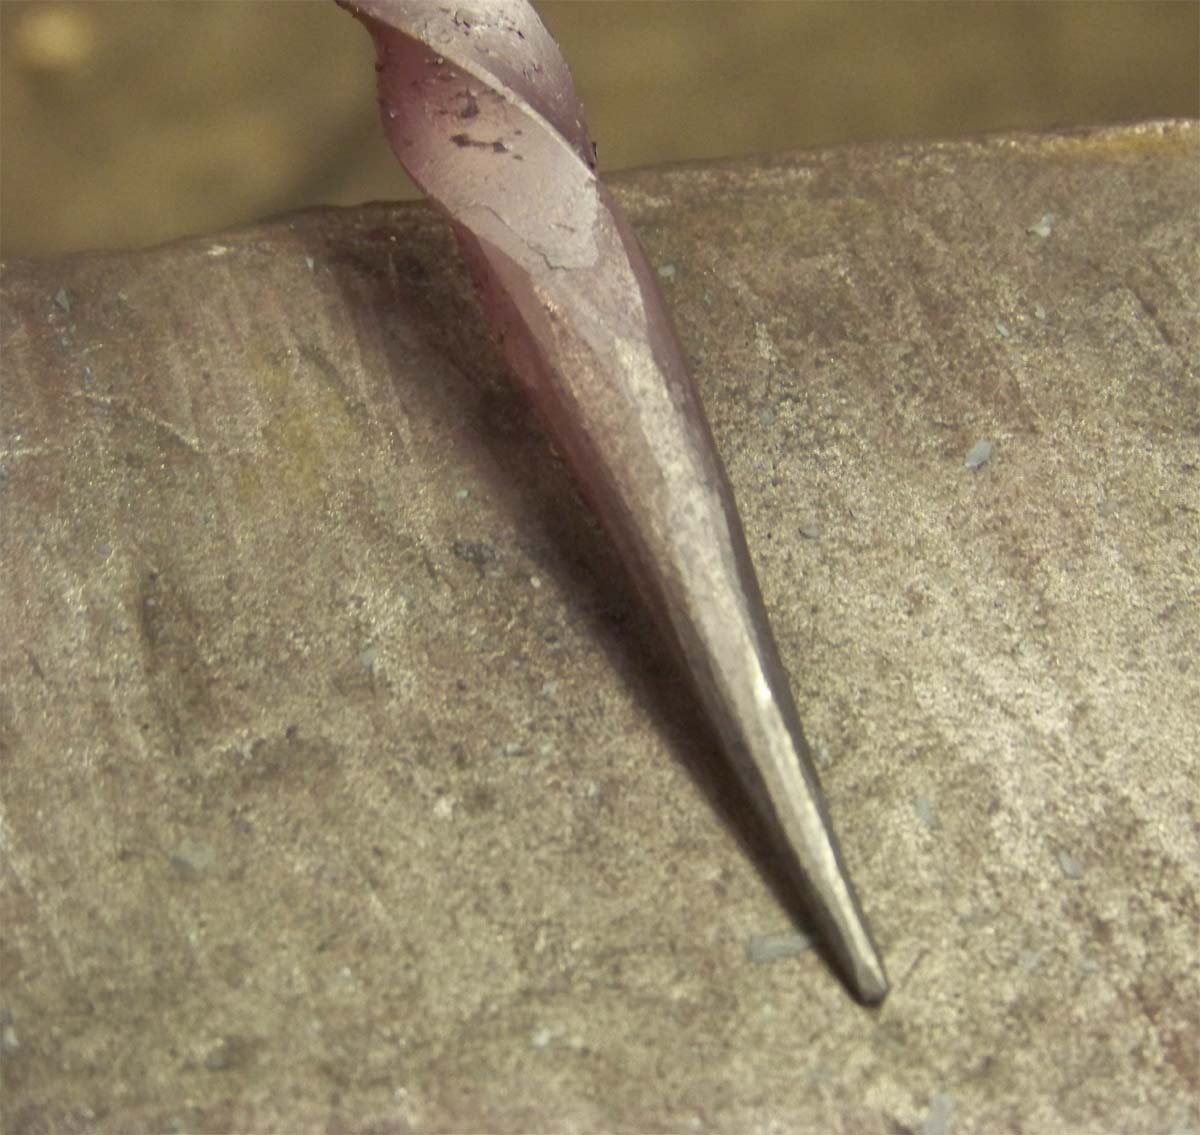
I round off that squared sharp end that the band saw left and rough grind the tapered tip at about a 90 degree angle. (just like the store bought ones)


Now to make it really hard.

The next step is the heat treat. Heat it again in the forge to a non magnetic state. Yes, that means heating it until a magnet will not stick to it any longer. I usually go just a bit hotter than that to allow for some cooling from the forge to the oil quench. Once up to temperature, it gets quickly dunked into a coffee can full of transmission fluid. This cools the spring steel quickly, locking all of the atoms into the state they are when it's at nonmagnetic. Now the center punch is very hard, but brittle. You could compare it with a diamond. A diamond can scratch just about anything, but hit it with a hammer and it will shatter to pieces. If I were to hit this center punch with a hammer, it may very well break into ten pieces.

So...... now I need to take some of the brittleness out of it by "tempering" it. To temper it I take a propane torch to the fat end and slowly heat it until the colors run towards the business end. I'm looking to get a darker straw color on the tip and blue or purple everywhere else. The straw color (about 480 degrees) will give me the hardness similar to the edge of a knife and the blue or purple color (about 560 degrees) will make it more like a spring, just like this piece of steel's original purpose. In the picture you can see that the end where the hammer will hit is actually past the purple color (back to normal color) which will make it just like I had never quenched it in oil. I don't want this so hard that it will mark up my hammer. In the middle is a nice dark blue/purple and the tip is a straw color.


As soon as the tip gets to that dark straw color, I quench it into some water to stop it from getting any hotter. Now I have a center punch that is not only hard, but also strong. I can now hit it with a hammer and it will easily mark mild steel and not deform or crack.


Here is the nearly finished center punch. All I need to do is regrind the tip the point I want and it's ready to go. I tested it by punching some mild steel a dozen or so times. There was no sign of any deformation on the sharp tip and it made a nice clean mark in the mild steel.


To not get too technical, I did not get into the details on how to thoroughly heat treat steel (annealing, normalizing, heat soak times, proper critical temperatures, proper quenching oil, etc...), but this simplified method does work well for what I need it to do. Another tool you could make that would follow almost the same heat treating procedure, would be a screw driver. Perhaps I'll leave that one for next week.


Have you ever heard of the phrase "don't get too hot and lose your temper"? That is an old blacksmith phrase. Blacksmiths use tools that have been heat treated and therefore "tempered" to a certain hardness. If you use a tempered tool on a red hot piece of steel and don't continuously cool it in water as you use it, it may get too hot and "lose it's temper". The hardness from the heat treat would be gone and you'd need to heat treat it all over again.


Thanks for coming by and I hope you enjoyed yourself. If you have any questions, please don't hesitate to ask.

Thursday, January 27, 2011

It Starts

It's not even February and I've already got a touch of the fever. Spring Fever that is. I like winter, don't get me wrong. I like the coziness of it, the long evenings, cups of tea, crackling fires in the fire place, an excuse to stay inside and get winter projects done like knitting and spinning, where in summer's tempting sunshine, I'd feel guilty staying indoors.

But every year somewhere between January and February, I start to yearn for something green, for new life. This year, I am trying to exercise a little will power and am not going to start an entire garden's worth of seeds too early, only to find the poor things straining at every window, leggy and pale and finally shriveling up by March 1st.

What happens is, I get looking through all those seed catalogs, and seed packets at the nursery, and it's all too tempting. I start out with good intentions, "I'll just get a couple herbs, for the window sill." Then I discover a new heirloom carrot, "Well, it won't hurt to plant just one heirloom carrot." Oooh, and there's a spring lettuce mix. "Well, I've already got the peat pots." Oooh and look at the purple tomatoes, and the birdhouse gourds, and the watermelons and before I know it, I have giant pumpkin plants growing in the living room.

This year I did pretty good. I only got a couple of herbs that we use often. Cilantro and sweet basil, a lettuce mix, and a sweet pea designed to be grown in pots. Not too bad right? It was tough though.

Wednesday, January 26, 2011

Wild Wednesday, More Hawks

I LOVE hawks! Click here to hear the Red Tailed Hawk. The most commonly used bird noise in movies. It's often used to represent the sound of a Bald Eagle. But the Bald Eagle call is much different.


Monday, January 24, 2011

Community Chickens, The "Eggsperts" Panel

Hi everyone,
I have a new Community Chicken's article posted, and some exciting news! I've become a member of the "Eggsperts" Panel. It's a small group of bloggers that answer readers questions. It will be a fun and informative new addition to the Community Chicken's site. To check out the post click here, "What Would You Do, The Case of the Wayward Hen".

Urban Mushroom Farming

For those of you in the south eastern Michigan area, on Wednesday, January 26 2011 there will be a mushroom growing demonstration.
As quoted from the e-mail sent by Chris Wright, the presenter of the meeting... "I will outline how anyone from a hobbyist gardener to a full-time urban farmer can, without difficulty, grow gourmet mushrooms in and around the home/farm.  The presentation will include a synopsis of the different species, strategies and methods available for growing mushrooms, as well as a discussion on how incorporating mushrooms into a traditional garden or cropping system can increase and maximize the ultimate nutritional yield per square foot.  A limited amount of spawn for growing mushrooms will also be available for purchase."

Wednesday, January 19, 2011

Projects, Spinning Colored Fleece

I'm excited to share with you a project I've been working on. Spinning this collection of colored fleece. I'm experimenting with different dying techniques, blending and spinning. I used our mohair that was too choppy to be sold, just to experiment with, but now that the yarn is turning out, I kind of wish I would have used good quality fleece, because I really like the colors. I dyed the raw fleece some time ago, and it's been sitting around in a basket waiting for me to make up my mind. Finally, I just decided to go for it.
Some of the fleece is dyed with Jacquard dyes, and some of it is with Kool Aid, (see dying posts). My goal was to create a mix of autumn themed colors and the finished project is just that, like an autumn sunset. There's a blend of raspberry, chocolate brown, sunshine, brick red, and burnt orange.
I started by layering the carders with each color. No real order, (I'm trying to work on trying to be more elastic with my work. Trying to let go, and not try to perfect and control everything in the whole universe. We will see?)

And combed it smooth, well, smoother. This wool is the reject wool that I didn't sell so it had bits of second cuts etc.
Rolled it into rollags.
And spun.

I'm going to ply it tonight and see how it looks. I'll keep you updated.

Wild Wednesday, Hawks

The birds of prey mating season is approaching. This is when you can get some really interesting glimpses pf hawks, owls and other prey birds. They seem so wrapped up in each other, that they will sometimes allow themselves to be viewed more easily without being spooked and chased away.
Last year we had a mother hawk build a nest at the side of our driveway. We could see her feeding her baby and hear the baby call for food. It was really interesting.
I'm slightly obsessed with hawks and have been tromping around in the woods lately under nests and places where the area hawks frequent, trying to find pellets, which are the undigestable part of a hawks "lunch" which they regurgitate. If you find these, you can dissect them and see what the hawk has eaten. I'm sure it's not everyone's cup of tea, but I think it's cool.

Tuesday, January 18, 2011

Cake Batter Ice Cream

I came up with this recipe by experimenting with different flavors. As I'm learning from making ice cream, once you have a good basic vanilla under your belt, you can start mixing up the ingredients and creating your favorites, and cake batter is my favorite!

Here's the Cake Batter recipe:


  • 1 cup sugar
  • 7 egg yolks
  • 1 cup heavy cream
  • 1 1/2 cup half and half
  • 1 Tbsp vanilla
  • 1/2 cup sprinkles
  • 2 cups yellow or white cake mix

Sift the cake batter to remove clumps.


Whisk sugar and yolks until sugar is no longer gritty.


In a pot, bring the half and half to a simmer.


Add the warm half and half to the yolk and sugar mixture, a little at a time, whisking constantly. Add the vanilla, heavy cream and cake mix.

Whisk well and strain. Set in the freezer for about a half hour until the mix gets good and cold but not frozen.


Freeze in the ice cream maker. When the ice cream gets to the "soft serve" consistency, mix in the sprinkles. Eat immediately for soft serve, or freeze for hand scoop firmness. 
BlogCatalog